LVM是逻辑卷管理,是Linux下对磁盘分区管理的一种机制,相信不少人想要知道Linux如何创建LVM和LVM的使用方法,因此小编将针对LVM的创建和使用做个详细介绍,一起来学习下吧。
LVM讲解:
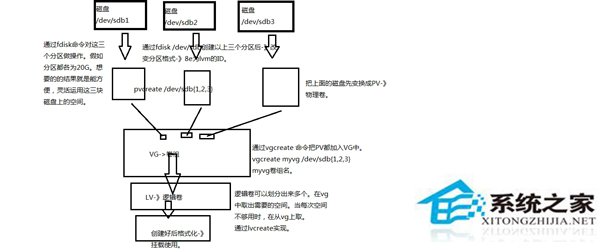
图像大纲:

1)LVM是什么,作用:
LVM称为逻辑卷管理,作用是提高磁盘分区的管理和使用灵活性。
通过逻辑卷LVM可以有效的管理和分配磁盘空间,可以把分散的小分区组合成一个大的卷组,从卷组中分出需要的空间做出逻辑卷,这样使得磁盘扩容和缩减方便易用。还有着备份的功能,指的就是lvm快照。
2)创建实例:
磁盘-》分区-》ID修改8e-》保存。
我用来一个磁盘通过分区来做的。还可以每个磁盘分一个区来做。
Device Boot Start End Blocks Id System
/dev/sdb1 1 1306 10490413+ 8e Linux LVM
/dev/sdb2 1307 2612 10490445 8e Linux LVM
/dev/sdb3 2613 3918 10490445 8e Linux LVM
3)创建物理卷:通过pvcreate命令。
pvcreate /dev/sdb1
pvcreate /dev/sdb2
pvcreate /dev/sdb3
[root@station106 ~]# pvs(查看创建的物理卷)。
PV VG Fmt Attr PSize PFree
/dev/sda2 vg0 lvm2 a-- 59.99g 7.99g
/dev/sdb1 lvm2 a-- 10.00g 10.00g
/dev/sdb2 lvm2 a-- 10.00g 10.00g
/dev/sdb3 lvm2 a-- 10.00g 10.00g
pvdisplay 查看更加详细的内容。
[root@station106 ~]# pvdisplay
--- Physical volume ---
PV Name /dev/sdb1
VG Name myvg
PV Size 10.00 GiB / not usable 4.54 MiB
Allocatable yes
PE Size 4.00 MiB
Total PE 2560
Free PE 2560
Allocated PE 0
PV UUID XP8QfA-WQDd-1v9p-QKxk-AztZ-Nr9e-QbN6Gu
--- Physical volume ---
PV Name /dev/sdb2
VG Name myvg
PV Size 10.00 GiB / not usable 4.58 MiB
Allocatable yes
PE Size 4.00 MiB
Total PE 2560
Free PE 2560
Allocated PE 0
PV UUID f8Dtdd-fV9e-1yB7-1B8P-21mU-CU2f-fQDAxe
--- Physical volume ---
PV Name /dev/sdb3
VG Name myvg
PV Size 10.00 GiB / not usable 4.58 MiB
Allocatable yes
PE Size 4.00 MiB
Total PE 2560
Free PE 2560
Allocated PE 0
PV UUID rKNL0x-WXq2-gHYD-T27r-Gf05-a4y3-f4zqzt
4)创建逻辑卷:通过vgcreate。
[root@station106 ~]# vgcreate myvg /dev/sdb{1,2,3}
Volume group “myvg” successfully created
[Ok3w_NextPage]
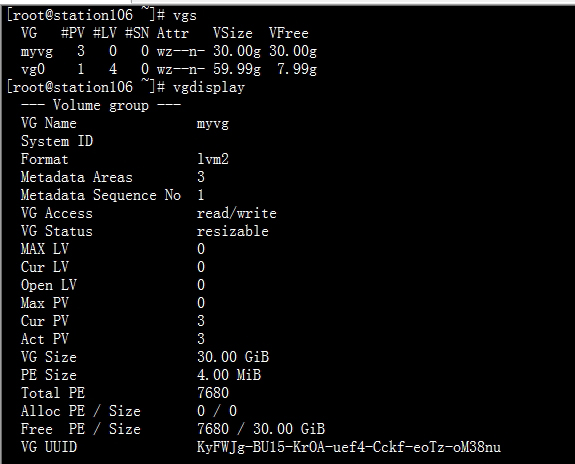
[root@station106 ~]# vgs
VG #PV #LV #SN Attr VSize VFree
myvg 3 0 0 wz--n- 30.00g 30.00g
5)创建逻辑卷,lvcreate。
[root@station106 ~]# lvcreate -L 10G -n test myvg
Logical volume “test” created
-L:空间大小。
-n:逻辑卷名称。
[root@station106 ~]# lvdisplay /dev/myvg/test
--- Logical volume ---
LV Path /dev/myvg/test
LV Name test
VG Name myvg
LV UUID wY1YUF-f0o6-jzu1-mtTL-64p0-qvfC-3QfF8y
LV Write Access read/write
LV Creation host, time station106.magelinux.com, 2014-02-10 11:18:43 +0800
LV Status available
# open 0
LV Size 10.00 GiB
Current LE 2560
Segments 1
Allocation inherit
Read ahead sectors auto
- currently set to 256
Block device 253:4
6)挂载使用创建好的逻辑卷。
mke2fs -t ext4 /dev/myvg/test 格式化。
mount /dev/myvg/test /mnt/挂载使用。
7)假如有一天逻辑卷不够用了。怎么从卷组扩展呢?如下分析。
逻辑卷扩展的大致步骤:
1,先确定扩展的大小,并确保所属的卷组有足够的剩余空间。
我现在要扩展5G,本身是10G的大小。命令如下:
[root@station106 ~]# lvextend -L +5G /dev/myvg/test
Extending logical volume test to 15.00 GiB
Logical volume test successfully resized
2,扩展物理边界。物理边界指的是本身的物理边缘大小。
[root@station106 ~]# lvdisplay /dev/myvg/test
--- Logical volume ---
LV Path /dev/myvg/test
LV Name test
VG Name myvg
LV UUID wY1YUF-f0o6-jzu1-mtTL-64p0-qvfC-3QfF8y
LV Write Access read/write
LV Creation host, time station106.magelinux.com, 2014-02-10 11:18:43 +0800
LV Status available
# open 1
LV Size 15.00 GiB
Current LE 3840
Segments 2
Allocation inherit
Read ahead sectors auto
- currently set to 256
Block device 253:4
当扩展完物理边界后你会发现,挂载中的逻辑卷还是本身的大小。
[root@station106 ~]# df -hT
Filesystem Type Size Used Avail Use% Mounted on
/dev/mapper/vg0-root
ext4 20G 387M 19G 3% /
tmpfs tmpfs 242M 0 242M 0% /dev/shm
[Ok3w_NextPage]/dev/sda1 ext4 194M 29M 156M 16% /boot
/dev/mapper/vg0-usr
ext4 9.9G 1.9G 7.6G 20% /usr
/dev/mapper/vg0-var
ext4 20G 288M 19G 2% /var
/dev/mapper/myvg-test
ext4 9.9G 151M 9.2G 2% /mnt
扩展逻辑边界,逻辑边界指的是挂载后,在使用中的逻辑卷也直接识别了。
[root@station106 ~]# resize2fs /dev/myvg/test
resize2fs 1.41.12 (17-May-2010)
Filesystem at /dev/myvg/test is mounted on /mnt; on-line resizing required
old desc_blocks = 1, new_desc_blocks = 1
Performing an on-line resize of /dev/myvg/test to 3932160 (4k) blocks.
The filesystem on /dev/myvg/test is now 3932160 blocks long.
[root@station106 ~]# df -hT
Filesystem Type Size Used Avail Use% Mounted on
/dev/mapper/vg0-root
ext4 20G 387M 19G 3% /
tmpfs tmpfs 242M 0 242M 0% /dev/shm
/dev/sda1 ext4 194M 29M 156M 16% /boot
/dev/mapper/vg0-usr
ext4 9.9G 1.9G 7.6G 20% /usr
/dev/mapper/vg0-var
ext4 20G 288M 19G 2% /var
/dev/mapper/myvg-test
ext4 15G 153M 14G 2% /mnt
上述就是扩展逻辑卷部分。
实例演示:缩小逻辑卷。首先为了测试我去原先挂载的录下创建一些文件,测试一下缩小后会不会导致文件消失。
缩小逻辑卷的步骤如下:
1)先卸载之前的挂载,并执行强制检测。
[root@station106 ~]# umount /mnt/
[root@station106 ~]# e2fsck -f /dev/myvg/test
e2fsck 1.41.12 (17-May-2010)
Pass 1: Checking inodes, blocks, and sizes
Pass 2: Checking directory structure
Pass 3: Checking directory connectivity
Pass 4: Checking reference counts
Pass 5: Checking group summary information
/dev/myvg/test: 13/983040 files (0.0% non-contiguous), 100864/3932160 blocks
2)缩减逻辑边界。
[root@station106 ~]# resize2fs /dev/myvg/test 10G
resize2fs 1.41.12 (17-May-2010)
Resizing the filesystem on /dev/myvg/test to 2621440 (4k) blocks.
The filesystem on /dev/myvg/test is now 2621440 blocks long.
[Ok3w_NextPage]3)缩减物理边界。
[root@station106 ~]# lvreduce -L 10G /dev/myvg/test
WARNING: Reducing active logical volume to 10.00 GiB
THIS MAY DESTROY YOUR DATA (filesystem etc.)
Do you really want to reduce test? [y/n]: y
Reducing logical volume test to 10.00 GiB
Logical volume test successfully resized
缩减后查看:
[root@station106 ~]# lvdisplay /dev/myvg/test
--- Logical volume ---
LV Path /dev/myvg/test
LV Name test
VG Name myvg
LV UUID wY1YUF-f0o6-jzu1-mtTL-64p0-qvfC-3QfF8y
LV Write Access read/write
LV Creation host, time station106.magelinux.com, 2014-02-10 11:18:43 +0800
LV Status available
# open 0
LV Size 10.00 GiB-》这里又变成了10G。
Current LE 2560
Segments 1
Allocation inherit
Read ahead sectors auto
- currently set to 256
Block device 253:4
挂载继续使用并且查看文件是否存在。
[root@station106 ~]# mount /dev/myvg/test /mnt/
[root@station106 ~]# cd /mnt/
[root@station106 mnt]# ls
accp benet lost+found--》查看还是存在。未丢失。
[root@station106 mnt]# df -hT
Filesystem Type Size Used Avail Use% Mounted on
/dev/mapper/vg0-root
ext4 20G 387M 19G 3% /
tmpfs tmpfs 242M 0 242M 0% /dev/shm
/dev/sda1 ext4 194M 29M 156M 16% /boot
/dev/mapper/vg0-usr
ext4 9.9G 1.9G 7.6G 20% /usr
/dev/mapper/vg0-var
ext4 20G 288M 19G 2% /var
/dev/mapper/myvg-test
ext4 9.9G 151M 9.2G 2% /mnt
假设VG卷组有一天,被逻辑卷用完了,怎么继续扩展卷组?
1)创建一个物理卷。
[root@station106 mnt]# pvcreate /dev/sdb5
Physical volume “/dev/sdb5” successfully created
2)把新的物理机加入到卷组中。
[root@station106 mnt]# vgextend myvg /dev/sdb5
Volume group “myvg” successfully extended
查看增加到的卷组。
[root@station106 mnt]# vgextend myvg /dev/sdb5
Volume group “myvg” successfully extended
[Ok3w_NextPage][root@station106 mnt]# vgdisplay myvg
--- Volume group ---
VG Name myvg
System ID
Format lvm2
Metadata Areas 4
Metadata Sequence No 5
VG Access read/write
VG Status resizable
MAX LV 0
Cur LV 1
Open LV 1
Max PV 0
Cur PV 4
Act PV 4
VG Size 40.00 GiB--》从30G到40G了。
PE Size 4.00 MiB
Total PE 10240
Alloc PE / Size 2560 / 10.00 GiB
Free PE / Size 7680 / 30.00 GiB
VG UUID KyFWJg-BU15-KrOA-uef4-Cckf-eoTz-oM38nu
有扩展卷组,就必须有缩减。缩减过程如下。
[root@station106 mnt]# vgreduce myvg /dev/sdb5
Removed “/dev/sdb5” from volume group “myvg”
[root@station106 mnt]# vgdisplay myvg
--- Volume group ---
VG Name myvg
System ID
Format lvm2
Metadata Areas 3
Metadata Sequence No 6
VG Access read/write
VG Status resizable
MAX LV 0
Cur LV 1
Open LV 1
Max PV 0
Cur PV 3
Act PV 3
VG Size 30.00 GiB
PE Size 4.00 MiB
Total PE 7680
Alloc PE / Size 2560 / 10.00 GiB
Free PE / Size 5120 / 20.00 GiB
VG UUID KyFWJg-BU15-KrOA-uef4
-Cckf-eoTz-oM38nu
LVM做快照。
快照是一种逻辑卷,通常为只读。通俗化说:“快照大小决定于备份的大小”
作用,能保持快照之前的操作,如后续操作有了影响,可以恢复之前的一些操作,也相当于快照之前做了备份,创建快照后,后续的操作队快照之前的无任何影响。
[root@station106 mnt]# lvcreate -s -L 50M -n snap -p r /dev/myvg/test
Rounding up size to full physical extent 52.00 Mi
创建的快照名称snap。
-L 设置大小。
-p:permission,设置生成快照的读写权限,默认为RW;r为只读。
-s:指定lvcreate生成的是一个快照。
-n:指定快照名称
挂载快照:下面是备份的内容。
mount /dev/myvg/snap /me
[root@station106 me]# ls
accp benet lost+found
然后备份处快照中文件即可,备份后及时删除快照。
[root@station106 ~]# lvremove /dev/myvg/snap
Do you really want to remove active logical volume snap? [y/n]: y
Logical volume “snap” successfully removed
上面就是LVM的创建和使用的介绍了,本文通过几个实例详细介绍了LVM的创建,包括逻辑卷的创建、挂载和扩展,希望对你有所帮助。